Deploy Django with Nginx + Gunicorn (Step-by-Step)
This guide shows you how to deploy a Django application in production using:
In this tutorial, you’ll learn how to deploy a Django application in production using:
- Nginx (web server)
- Gunicorn (application server)
- Ubuntu (VPS)
By the end, your Django app will be live and accessible via your server.
⚡ Quick Overview (What You’ll Do)
- Set up your Django project
- Install Gunicorn
- Configure systemd (service)
- Configure Nginx
- Serve static files
🧠 Architecture (How it works)
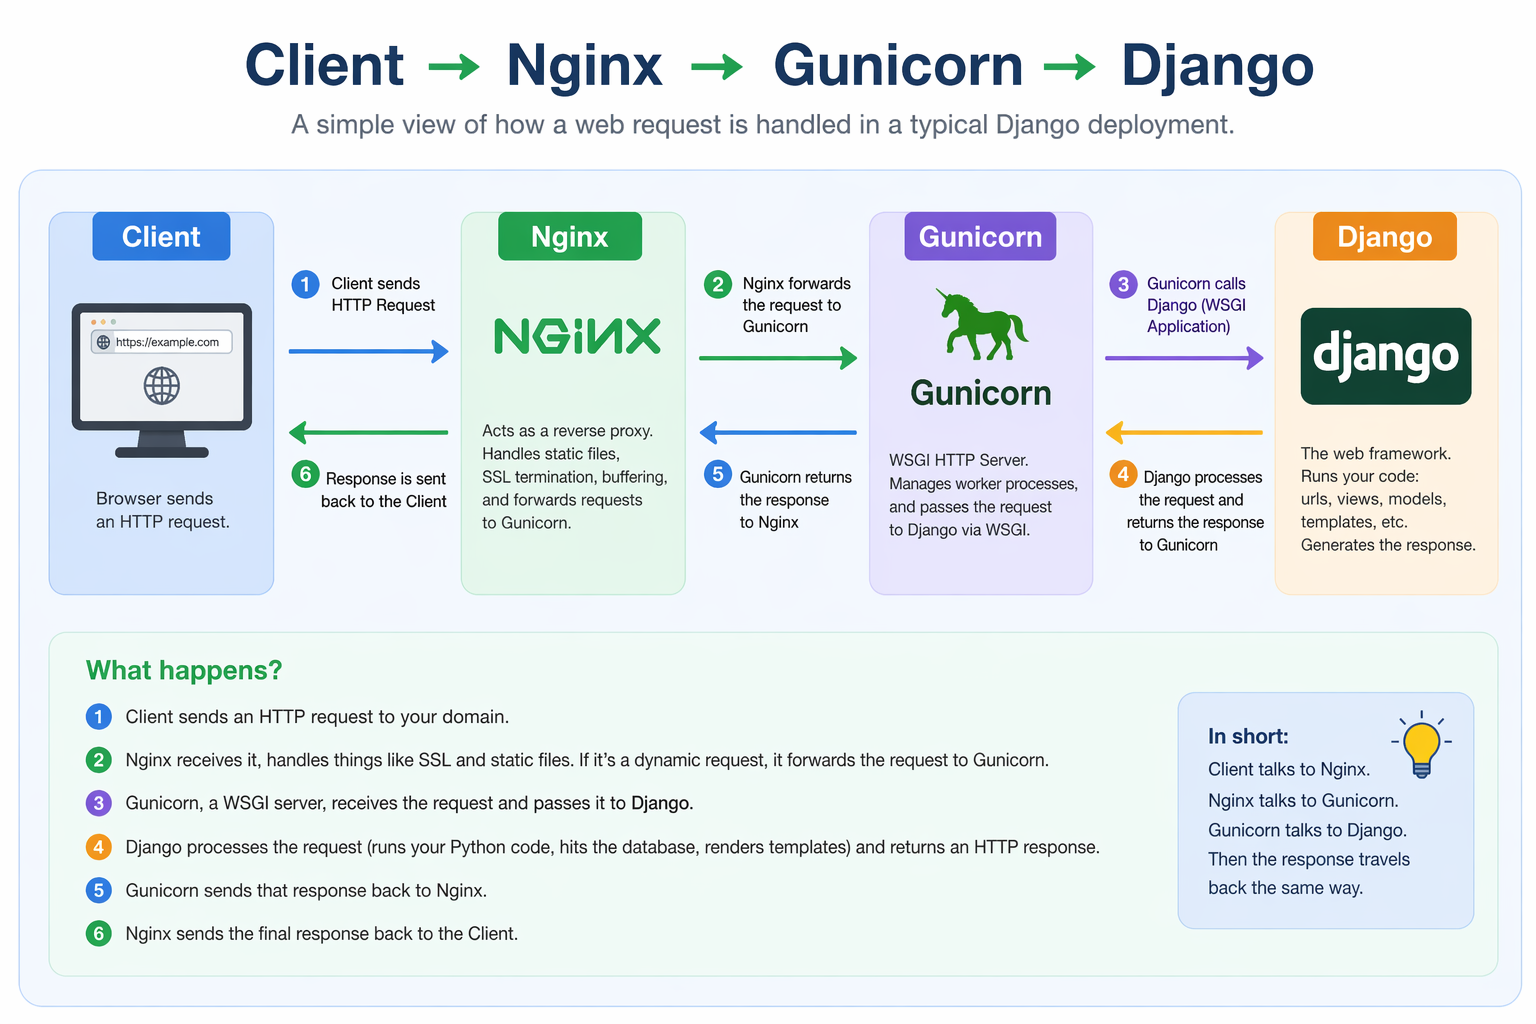
Flow:
Client → Nginx → Gunicorn → Django
- Nginx handles HTTP + static files
- Gunicorn runs your Django app
🧱 Prerequisites
- Ubuntu server (22.04+)
- Python 3 installed
- A working Django project
1. Set Up Project
sudo mkdir -p /var/www/myproject
sudo chown -R $USER:$USER /var/www/myproject
cd /var/www/myproject
Create virtual environment and activate it:
python3 -m venv venv
source venv/bin/activate
Install dependencies
Create or upload your project files to /var/www/myproject
django-admin startproject myproject .
Test Django:
python manage.py runserver 0.0.0.0:8000
Open:
http://you-server-ip:8000/
or
http://localhost:8000/
2. Configure Gunicorn
gunicorn --bind 0.0.0.0:8000 myproject.wsgi:application
Test Gunicorn manually:
gunicorn --bind 0.0.0.0:8000 myproject.wsgi:application
If this works → proceed.
3. Create Gunicorn systemd Service
Create file:
[Unit]
Description=gunicorn daemon
After=network.target

[Service]
User=www-data
Group=www-data
WorkingDirectory=/var/www/myproject
ExecStart=/var/www/myproject/venv/bin/gunicorn \
    --workers 3 \
    --bind unix:/var/www/myproject/gunicorn.sock \
    myproject.wsgi:application

[Install]
WantedBy=multi-user.target
Start Gunicorn:
sudo systemctl start gunicorn
sudo systemctl enable gunicorn
Verify Gunicorn is running:
sudo systemctl status gunicorn
4. Install and Configure Nginx
sudo apt update
sudo apt install nginx
Create config file:
sudo nano /etc/nginx/sites-available/myproject
Or use your favourite editor.
Add this config:
server {
    listen 80;
    server_name your_domain_or_ip;

    location /static/ {
        root /var/www/myproject;
    }

    location / {
        include proxy_params;
        proxy_pass http://unix:/var/www/myproject/gunicorn.sock;
    }
}
Enable site:
sudo ln -s /etc/nginx/sites-available/myproject /etc/nginx/sites-enabled
sudo nginx -t
sudo systemctl restart nginx
5. Configure Static Files
In settings.py:
STATIC_ROOT = '/var/www/myproject/static/'
Collect static files:
python manage.py collectstatic
6. Fix Permissions
sudo chown -R www-data:www-data /var/www/myproject
sudo chmod -R 755 /var/www/myproject
7. Final Test
Visit:
http://your-domain-or-ip
or:
http://localhost
👉 Your Django app should now be live and served by Nginx + Gunicorn!
🔥 Common Issues
🔴 502 Bad Gateway
Fix:
sudo systemctl restart gunicorn
sudo systemctl restart nginx
🔴 Static files not loading
- Check
STATIC_ROOTin settings.py - Run
collectstatic
🔴 Permission denied
sudo chown -R www-data:www-data /var/www/myproject
🧠 Production Checklist
Use Let's Encrypt with Certbot:
sudo apt install certbot python3-certbot-nginx
sudo certbot --nginx
Once the stack is live, enable HTTPS with Let's Encrypt and run the production checklist before you call the rollout complete.
🔗 Related Guides
- Fix Django 502 Bad Gateway
- Django static files not loading
- Docker-based Django deployment
- Set up HTTPS for Django
❓ FAQ
Why use Gunicorn?
It’s a production-grade WSGI server designed to run Django apps efficiently.
Why use Nginx?
- Handles HTTP requests
- Serves static files
- Acts as a reverse proxy
- Can I deploy without Nginx?
Yes, but not recommended for production.
🎯 Final takeaway
This setup is:
- Simple
- Reliable
- Widely used
If something breaks, you now have a clear structure to debug it.